Happy New Year 2011!

New is the year, new are the hopes and the aspirations, new is the resolution, new are the spirits and forever my warm wishes are for you.
Have a promising and fulfilling new year!

New Year Wish...

Perhaps a bit wiser,
a bit kinder, too,
a little bit braver,
a heart that's more true,
a touch of believing
I've not known before,
in joys I'm receiving
a little bit more.

Happy New Year 2011!
A little more anxious
to reach out my hand,
despite hurt or problems
to still understand,
accepting the heartache
that life often brings,
a little more beauty
in life's simple things.

A prayer when I'm weary
as onward I trod,
a little more trusting,
believing in God,
'tis this I would wish for
within moments dear,
not a lot - just a little
this wondrous new year.
~ Garnett Ann Schultz
Read more >>

Christmas Gift-Merry Christmas!

Christmas Gift

The gifts I'd leave beneath your tree,
Aren't those that you can touch or see,
Not wrapped in Christmas tissue gay
But gifts to bless you every day
The gift of friendship warm and true,
Is one that I would leave for you
Good health and happiness and cheer
To keep you smiling through the year
The gift of peace that comes from God,
With prayer to guide each path you trod
And when your heart has lost its song
The gift of hope to cheer you on
These are the gifts I'd leave for you

~Maureen

Merry Christmas
I wish all my friends and visitors a blessed and merry Christmas!
May Peace be your gift at Christmas and your blessing all year through!
Read more >>

Autumn Sunlight - original oil painting

This painting is a contest piece for the first monthly competition at How to draw and paint painters' community.
The contest was about recreating and interpreting a woodland scene from a given photo in any drawing or paint medium.
autumn forest scene near a river
I began the painting in the last moment before the submissions deadline, so I painted the first layers in acrylics and the finishing touches in oil paint. I used an 18 x 14 inch. (45 cm x 35 cm) stretched canvas prepared previously with 3 layers of universal gesso.
There were 62 entries and I took the second prize with this forest scene painting, as a result of members' voting.
I am quite happy with the outcome.
Please have your say in the comment box!
Read more >>

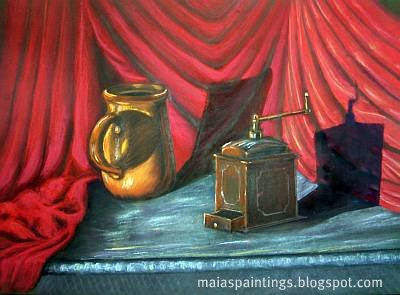
Red drapery with mug and coffee mill-still life

It's been a while since I last posted to this blog. Even now I have just a older drapery study in pastel.
Red drapery with kitchen ware: antique coffee mill and mug.
Drapery with coffee mill and mud-pastel still life
Read more >>

Best Easter wishes - Happy Easter!

The spirit of Easter
is all about Hope,
Love and Joyful living.
Happy Easter!

Best Easter wishes
Best Easter wishes to all my friends!
Easter eggs
Have a look at these easy egg painting templates and coloring pages for more Easter fun.
Read more >>

Holy week- Leonardo da Vinci

On the Holy Week, when we talk about saints, I should like to include this video about my icon, LEONARDO DA VINCI.
Here are some works of the greatest painter of all times, the most diversely talented person ever to have lived, the mysterious genius we will never be able to fully understand, yet not a saint.


Happy Easter everyone!
Read more >>

Shading the rose - rose drawing part 2

In this second rose drawing lesson we will shade the rose created in the first lesson.
Last time we've created a two dimensional drawing (width, height), by outlining the visible edges of the rose. For this rose to look realistic we have to create a (false) third dimension: depth of field.
We can accomplish this by several techniques; by hatching, shading, combining these two and for even more interest, with texture drawing and cross contour drawing.
I don't give any indications on how to hold your pencil or how to alternate H pencils with soft B pencils. The simple fact that you are here means that you are motivated to find intuitively the right way you feel comfortable with. Still there are some important things to take in consideration when shading the rose.

Tips for shading a rose.

1. Value-the lightness or darkness of tones, is the tool for creating a convincing illusion of three-dimensionality, the realistic effect.
When shading, we have to switch from linear drawing to value drawing focusing on areas of value.
Observe the dark and light areas on the petals and in different parts of the rose, also shadows and highlights.
Be aware of the optical effect of tonal value:
- light areas come forth, dark areas retract. It is easy to remember: light pushes dark back. Isn't that always true? Value in conjunction with contrast is what makes the rose pop out of the two-dimensional paper sheet.
-highlighted contour lines are fine lines and lines in shadow are heavier lines.
shading a rose-line direction
2. Line direction: by shading or hatching we should create a shaded surface that follows the three-dimensional form of the petals. Am I too abstract?
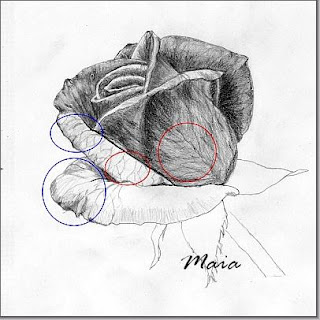
I'll explain that: a rose petal has the form of a circle (let's pretend); shading and hatch lines have to follow a radial direction, originating from the body of the rose ( see the red guide lines on the first image).
Each petal has a different position in space, so the line direction of shading-hatching changes accordingly to the petal's position.

Shading the rose

Step 1. Start with the darkest area of each petal near the body of the flower using a soft pencil. Keep the shading lighter at first.
Work your way from the center to the outer edges of the flower petals, lighten the shading toward the edges.
Apply the tone with small sideways movement of the hand in the direction mentioned above.
Continue to shade the hole rose drawing.
using cross-contour
Step 2. increase contrast.
After applying a middle tone on the hole surface, begin to darken the very darkest shadows even more, increasing contrast. The darkest shading is at the base of the petals and between petals.
It is impossible to get values right the first time you draw, so be patient and adjust your drawing observing your reference.As you progress, the contour lines should not be visible any more but the edges of adjoining areas of light and dark tones. Line is just a convention, it does not exist on the real rose. There is only the contrasting boundary between light and dark areas that forms the line.
Step 3. Blending
For a smooth surface you might like to try using a paper stump to blend tones but be careful, it can destroy all your work.
Cut a small piece of eraser to have a sharp edge and lift up highlights at the edges of the petals.
texture drawing
Step 4. Applying texture - add more interest.
Opposed to the soft look of the petals, to create a more powerful expression of the rose, add some texture (partially), to indicate the veins in the petals in a few places. See the red marks on the image.
Step 5. Cross - contour lines.
For even more interest add some hints of cross-contour to suggest the petals' form and bending (marked with blue on image 2 and 3).
This is the most interesting part as you don't have to draw much. Just indicate the direction with these cross contour lines and the brain fills in the rest of the information.
The finished rose drawing
Step 6. Finishing the shading - drawing. Shade the sepals and darken the shadow edge of the stem observing where the shadow parts fall on the reference photo or on a real model.

Now step back and look at your beautiful rose drawing. Don't forget to sign it.

Sometimes it can happen that you are not quite pleased with the outcome but you can't figur out what is wrong with the drawing. It is more a feeling than seeing.
In this case put your drawing away and come back to it the next day. Than you will see it more objectively, like it would be someone else's work and you will find more easily the part that has to be adjusted.

See some more examples of shading.

Read more >>

Still life sketching-pencil drawing

Read more >>

How to draw a rose in five steps-drawing lesson

Let's draw a beautiful rose in five easy steps!
Using my sketches, in this drawing lesson you can draw a beautiful rose in five easy steps.
Beautiful rose-pencil drawingYou can draw a rose in many ways; this is only one way and you can see the result in the this picture.
To create this drawing I used this red rose photo.
Beautiful red rose-reference photo It is not a good one but at least it is a simple rose.
Materials: supposing this is an exercise, you can use whatever paper you have at home.
Use a soft graphite pencil or colored pencils and keep handy an eraser.

For my rose drawing I used simple computer paper.

Draw a rose in five steps-step 1Let's start!

Draw a rose in five steps:

Start in the central part of the paper to be sure your rose fits in the page!
Step 1:
-draw a simple tulip like form, just as you see on the picture,

Step 2:
- outline the inner petals adding them to the tulip form,
- in the detailed drawing I outlined with red this part.

Draw a rose in five steps-step 5step 2-details
Draw a rose in five steps-step 3Step 3:
- add the outer petals, (the contour of the rose). You can start from the green point to outline the petals, to the right or to the left, you choose.
Now here is a chance to exercise blind contour drawing. If you wish to try, put your pencil at the green point, observe and follow the line direction with your eyes and in the same time draw it with the pencil, without lifting it from the paper. Don't look at the paper till you are done and don't push the pencil, so you can erase the line if you don't like it.
It must not be the same as in my sketch. Roses are all different, still beautiful.
This way we complete the drawing from inside to outside. If you wish to draw the rose from outside to inside than complete step 3 first and than step 2. The result is the same.
Draw a rose in five steps-step 4Step 4:
- lightly mark the inflection line of the petals, the line from where the petals bend, (1) and erase the unnecessary part of the tulip form.
Step 5:
- outline the stem an the sepals.
That's it, your rose drawing is ready.
Yes, I know, it is not ready yet; you have to shade it or to color it.
Draw a rose in five steps-step 5
Shading can be done in many ways but this includes some more steps.
I've already exceeded the size of this post so I'll talk about shading in my next post, soon, I promise.
I hope you enjoyed this tutorial.
If you have any questions concerning this drawing lesson, just ask in the comment box.

Update:
Lesson about shading the rose is ready.
Read more >>

Fantasy in a cave-acrylic painting

Fantasy in a cave is a 32cm x 20cm (12.6 x 7.9 in) small acrylic painting on board.
A few hours ago I began to paint a still life but my fantasy has made a (slight) deviation from the subject and this is what I ended up with.
It is just a fantasy, I see it as cave scene.
Fantasy in a caveClick on the Creative Every Day badge in my sidebar to see other beautiful works at Leah's website.
Read more >>

Search for paintings, photos and tutorials!